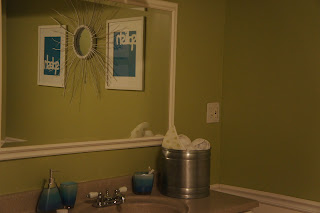
I was instantly inspired by the idea of using words, instead of pictures, to decorate Colton's bathroom. But what words to use? As I was giving Colton a bath one night, we were busy singing (well, I was singing, he was splashing) "Splish, Splash...I Was Taking a Bath" when it struck me. Of course, the entire song was too long, but a simple "splish" and "splash" would work perfectly with the two frames I already had flanking my Sunburst mirror:
This past weekend, Colton and I were hitting up our local AC Moore. We tend to go there often, and I had searched a few times for letters that would work for this project and others. Most of the letters I found, though, were too boxy, or scripty, or big, or small...you get the idea. But this weekend, I stumbled upon some Dr. Seuss letters in the teacher section on sale (since Dr. Suess Day was almost two months ago) for $2!!!! AAAAAHHHH...I can't believe how excited I got over these darn letters, but needless to say, I scooped them up, hurried home, and got started.
First I rounded up my supplies:
- 2 matted frames (mine were 16 x 20)
- white cardstock...2 pieces
- the Dr. Seuss letters for tracing
- pencil
- ruler for a nice straight line
- glue
After gathering, I got to work painting. As you can see from the above photos, I just painted right on the cardboard that comes in the frames. I needed three coats of paint to get full coverage. In between each coat, it took about 15 minutes to dry.
While the paint was drying, I got to work tracing my letters on to the white cardstock:
Once the paint was completely dry and the letters were all cut out, I used my ruler to line "splish" up at the top of the first frame and "splash" at the bottom. Here's a picture of my work in progress:
After letting the glue dry for a bit, I put the cardboard back in the frames, hung those suckers back on the wall, and this is what Colton's bathroom wall looks like now:
I'm pretty pleased with it, especially considering my grand cost for the project was a whopping $4 for the Dr. Seuss letters (which I think I will use over and over again) and some cardstock! Plus, this took all of about an hour and most of that was just drying time. I also love how adaptable it would be to any room and theme.
So, tell me what you think. I'd love to hear from you:)
And for even more fun redo ideas, go check out Metamorphosis Monday


That is so adorable! It's such great bathroom decor! So cute!
ReplyDeleteSimply Kate
Love your take on the original idea. I am wanting to do the same thing in my kids' bathroom I just haven't come up with anything more creative than the original artwork! LOL!
ReplyDeleteSuch an adorable idea!
ReplyDeleteSaying hi from Mingle Monday! I love that idea-- so cute and easy!! can't wait to see your other DIY ideas as I will be decorating my new apartment this summer!
ReplyDeleteLove those Seuss shaped letters. What a cute (and inexpensive) makeover!! I would love it if you would link this project up to my blog party, A Marvelous Mess....each week I pick one project to feature on my side bar!! Here is the link: http://tinyurl.com/3chfp5t
ReplyDeleteThanks so much for stopping by my blog earlier! I actually had already stopped by yours early today but didn't have time to leave a comment. I love these paintings! Gosh, I even liked it when it was just the paint and and swirls. Great job! I'll be sure to stop by again!
ReplyDeleteThose are so cute! I actually like them a lot better than The Land of Nod art! Fabulous!
ReplyDelete