 |
| I apologize for the mess, and bonus points if you spot the preview of what's to come! |
After patrolling my favorite stores and websites for 10+ months looking for reasonably priced, geometrical patterned (as opposed to floral or stripes, etc), that fit my color scheme (clay brown, not chocolate)...I was about over it. One day, though, I was randomly watching "The Nate Berkus Show". He featured a stencil to use as a wall-covering, and immediately I knew I had my answer...I would stencil my Vivan curtains (genius, I know...note sarcasm).
My project supply list included the following:
- set of curtain panels (I already mentioned I used IKEA Vivan)
- 3 inch **sponge** roller
- at one point in my project, I needed a new roller and attempting to avoid a trip to my craft store I went to Home Depot (more convenient) instead...BIG MISTAKE! The wall rollers just pulled up my stencil constantly
- acrylic paint in chosen color (I went through approximately 5 bottles for 2 panels)
- stencil paper
- craft knife to cut stencil
- stencil tape to hold stencil down each time
- cardboard
- Nate's stencil
The process was really pretty straightforward. First, I printed out the stencil and taped it on top of stencil paper. Using the craft knife, I traced/cut out the lines of the stencil.
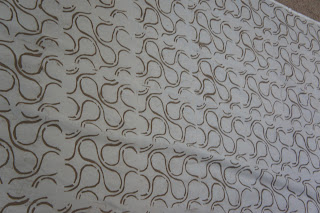
After ironing and hemming the curtains, I just laid a panel down on the floor and taped the stencil to the top left corner. I used my roller to paint over the stencil. I put a piece of cardboard under the part of the curtain that I was painting to make sure none bled through on to the floor. Once done, I just lifted the stencil, taped it down at the first one's end point, scooted over my cardboard, and got my roll on again. Here's a look at my work in progress:
And a close up in case you're like me and need lots of images:
After repeating that process about a bajillion times, this was my final result:
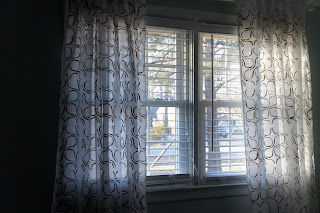
And hung in all their glory in our bedroom:
I'm pretty pleased with them. The whole project cost me about $50 for 2 sets of window panels and all of the supplies. Time wise, I spent about 2 hours per panel, although admittedly, I started to get a little less precise with lining up my stencil as the process went on. Because the curtains were going to fold, I reasoned you wouldn't be able to tell, and for the most part, I think I was right.
Overall, it really was quite the easy project (although my back and knees were not so pleased with me after being hunched over for a good part of the weekend)...pretty mindless, fool-proof work (the kind I excel at). A bigger stencil would certainly have helped (I couldn't find one in a pattern I like without having to spend beaucoup bucks...and at that point, I may as well buy the beaucoup buck curtains). But I got curtains that met all of my criteria, so I think it was worth it.
What do you think? Ever attempted stenciling anything? I am already trying to come up with other things I can stencil!!!


wow! i think they turned out great!!! i also think curtains really make the room but i always seem to have quite the time putting the rods up!
ReplyDeletehave a great day!
New follower/admirer from Meg's Mingle here...enchanted by your ability to do all this amazing stuff (I am incompetant with a capital 'I') and intrigued by the fact you have a cockapoo...I'm going to see if you have any photos of him/her next. I've seen a labradoodle but not a cockapoo.
ReplyDeletePlease do drop by and maybe follow if you fancy a laugh. All talented people are more than welcome...please bring the dog!
Warm wishes
Carol from www.facing50withhumour.blogspot.com
Hello hello! Just visiting from Mingle Monday! These look amazing, I'm so impressed. I'm pretty much the most domestically-challenged person ever....
ReplyDeleteCheck me out at www.poodleism.com!
Those look fabulous! A little too ambitious for me {though I do need curtains in our bedroom as well}, but overall I think they turned out perfectly! Good job!
ReplyDeleteI'm visiting from Mingle Monday. I hope you have a wonderful day :)
xoxo,
Joelle
Hey from Mingle Monday!
ReplyDeleteI LOVE the curtains. They're awesome! I wish I was that talented. ;)
-brittney
http://brittneyschermerhorn.blogspot.com/
luv the final product!!! stunning job :D
ReplyDeleteSaying hello from mingle monday...was drawn to your blog because I'm in the same general area as you are! And I love those curtains! I don't have patience for that kind of thing, but the end product seems to be totally worth it! :)
ReplyDeletehappy monday :)
chloe.
Love it! Stopping by from Mingle Monday.
ReplyDeleteWOW! Thanks guys for all the support:). I am pretty pleased with them as well, but it's certainly nice to hear that others like them
ReplyDeleteAbsolutely love the curtains! When I move this summer, I will definently be trying this out.
ReplyDeleteLooks great! It's amazing what you can do for a small price isn't it. I'll be back seeing as I'm going to be following you.
ReplyDeleteWhat a great project! They turned out awesome. Found you from TDC; I'm your newest follower!
ReplyDeleteWow, thank you for sharing this idea! I bought some inexpensive white fabric for my living room curtains, and I'm not liking the all-white look. Guess what I'll be doing soon!
ReplyDeleteSo cool! I would never have thought to do that. What a great design. I never like the designs on the curtains in the store...never thought of making my own!!!
ReplyDeleteWOW!!! These turned out so nice...great job..
ReplyDeletesherry ;-)
Yes, they turned out great! I'll have to check out the stencil!
ReplyDelete