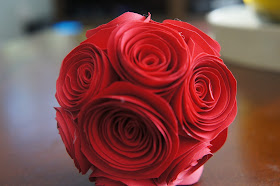
This weekend, I have a Kentucky Derby party. I'm purchasing (or more appropriately my client is purchasing) several dozen roses, so they will serve as the obvious decorating cornerstone! However, you know I couldn't resist coming up with something a bit more original than that! So I present to you Paper Rose Poms...
Making them was actually pretty straightforward, albeit time consuming! If you want to make your own, you're going to need:
- styrofoam balls (honestly I don't really recommend going larger than 3 inches, unless you have more patience than I do...it took me about 6 hours to fill up a 4 inch ball!)
- 12 x 12 scrapbook paper of your choice
- scissors
- hot glue
To make your roses, begin by folding a 12x12 piece of paper into fourths. Take one of the four squares (so it measures 3x3) and cut out a circle in it, as large as you can within that space...basically you're trying to make a circle that is 3 inches in diameter without actually taking the time to measure it! As you go to complete your circle, instead cut in and begin spiraling in with your scissors about 1/2 inch each time. Repeat until you get all the way to the center and have a little tab left. That's probably a horrible description, but hopefully this picture helps explain it...
Once you're all cut out, begin rolling. Starting with the outermost piece, roll the paper up starting off as tight as you can. You can let the rolls get a little looser as you go if you want.
Once you are at the end, you should have that little tab piece left. Put a dot of hot glue on that and press it into the back of your "rose" to secure it.
Glue that rose to your styrofoam ball and then repeat that process until the whole ball is filled in.
Like I said, it's definitely not a hard process. But it is pretty time-consuming. So here's a better idea. If you like the rose poms, but don't want to/don't have the time to make them yourself, let me do it for you!!!! Paper Rose Poms are now available for sale in my Etsy store:) Check them out here.


No comments:
Post a Comment
Make my day...leave a comment